BookraftAI Documentation
A self-hostable AI book generation platform with KDP-ready PDF export, four payment gateways, and an admin panel — built on Next.js 16 and Express 5.
📖 Overview
BookraftAI is a full-stack web application that turns a short brief into a finished, print-ready book. It ships as two services:
- frontend/ — Next.js 16 (App Router) + React 19 + Tailwind v4 UI.
- backend/ — Express 5 API on Node 18+ with MongoDB via Mongoose.
Buyers self-host both services. End users supply their own AI provider keys (OpenRouter, optionally OpenAI), so you don't pay for their inference. Books are billed via a credit system charged through Stripe, PayPal, Razorpay, or Dodo Payments.
✅ Requirements
| Component | Minimum |
|---|---|
| Node.js | 18.x or newer (20.x LTS recommended) |
| MongoDB | 6.x or newer (Atlas free tier works) |
| Disk | ~500 MB for source + node_modules; persistent storage for backend/uploads/ on production hosts |
| Memory | 512 MB minimum per service; 1 GB recommended |
| OpenRouter | Account + API key for AI generation |
| OpenAI | Optional — only required for strict image-trim sizes |
📦 Installation
1. Unzip and install dependencies
cd bookraft-ai/backend
npm install

cd ../frontend
npm install
2. Configure environment files
cd backend
cp .env.example .env
# Edit .env — set MONGODB_URI and JWT_SECRET at minimum

cd ../frontend
cp .env.example .env.local
# Defaults to http://localhost:5001/api — change for production
3. Start in development
# Terminal 1 — backend on :5001
cd backend
npm run dev

# Terminal 2 — frontend on :3000
cd frontend
npm run dev
Open http://localhost:3000.
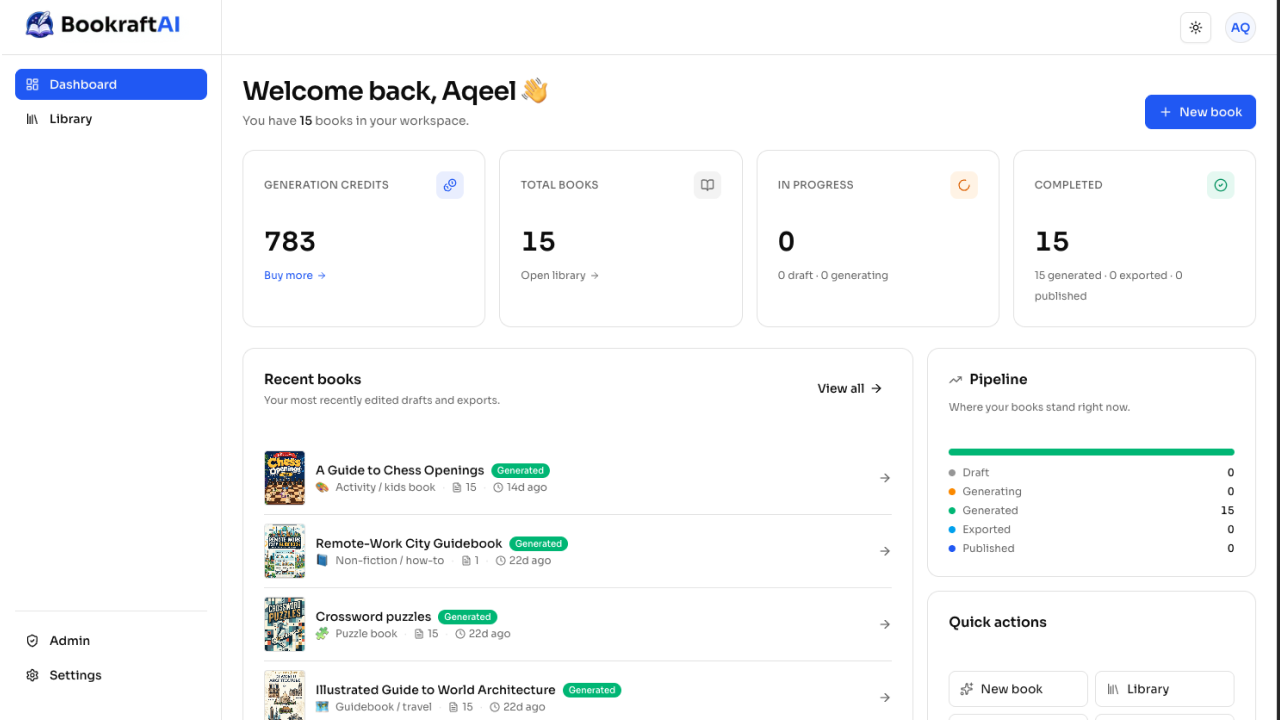
🚀 First run
- Sign up at
/signup— the very first user is automatically promoted toadmin. - Open Settings → paste an OpenRouter API key. Optionally add an OpenAI key.
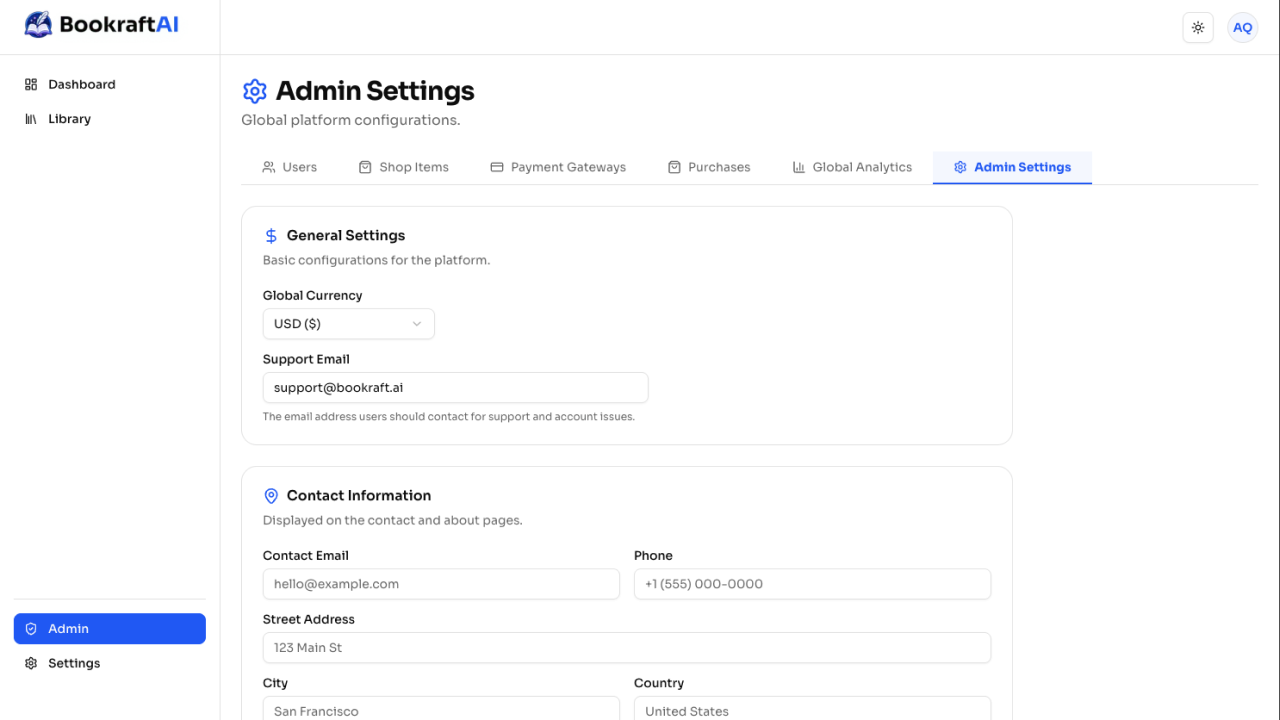
- Open Admin → Settings → set the Support Email. Add Contact Information and Social Links if you want them on the public Contact page.
- Open Admin → Plans → create one or more credit bundles.
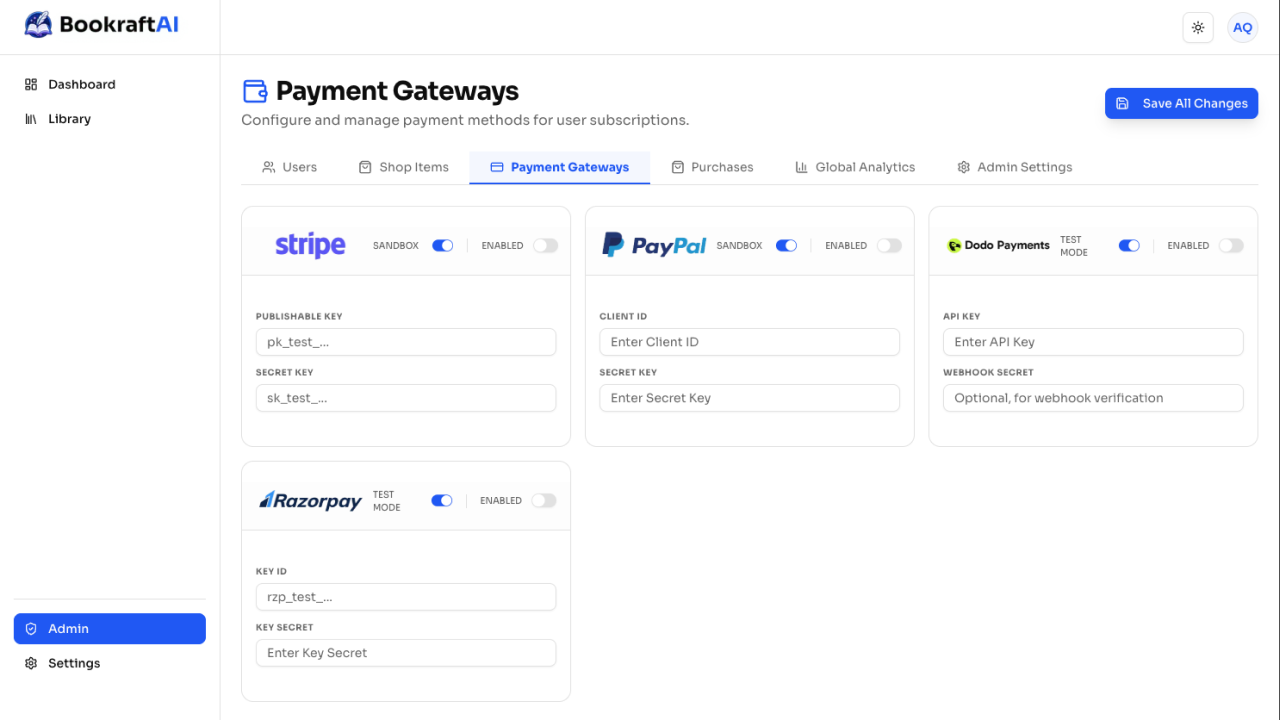
- Open Admin → Payment Gateways → enable any combination of Stripe, PayPal, Razorpay, Dodo and paste keys.
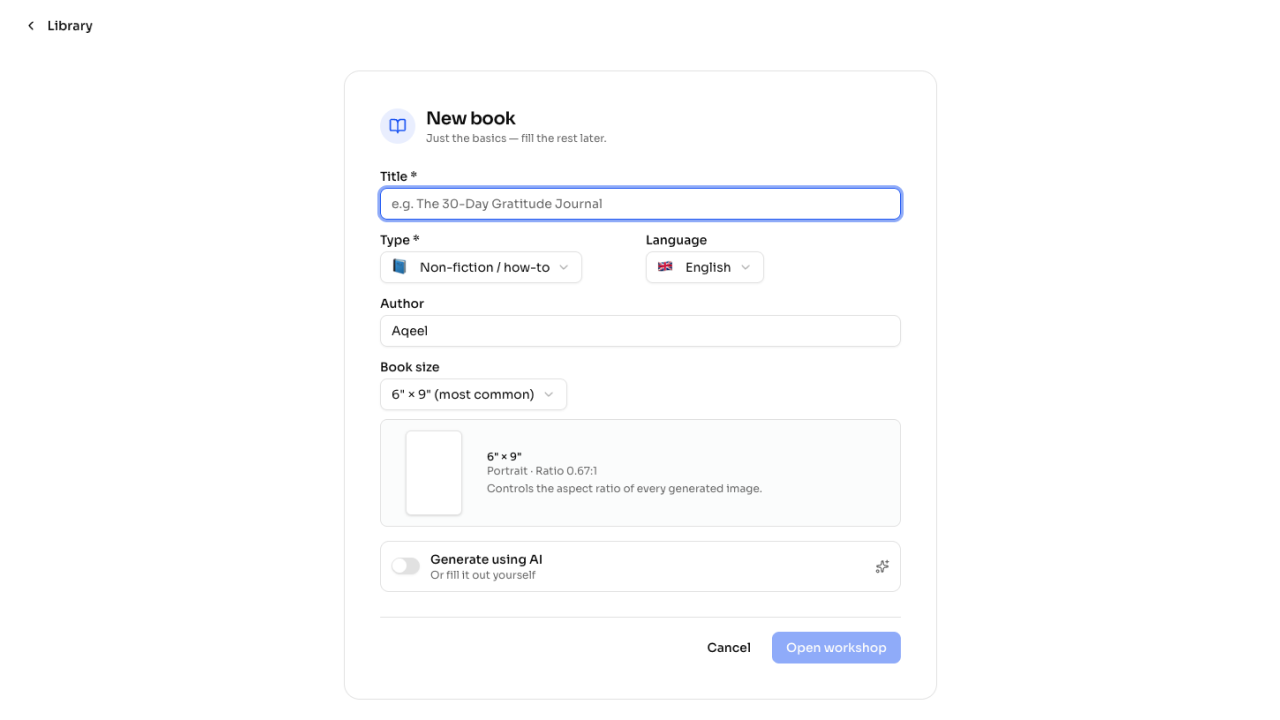
- Generate your first book from
/library→ New book.
⚙️ Backend environment variables
| Variable | Required | Default | Purpose |
|---|---|---|---|
MONGODB_URI | Yes | — | MongoDB connection string |
JWT_SECRET | Yes | — | Secret used to sign JWTs. In production, the server refuses to boot if this is missing or set to the example placeholder. |
PORT | No | 5001 | API port |
NODE_ENV | No | development | Set to production on production hosts. |
CLIENT_URL | No | http://localhost:3000 | Used for CORS, payment redirects, and post-OAuth redirect. |
SERVER_URL | No | http://localhost:5001 | Public base URL of this API. Used for the Google OAuth redirect URI. |
GOOGLE_CLIENT_ID / GOOGLE_CLIENT_SECRET | No | — | Set both to enable Google sign-in. |
OPENROUTER_API_KEY | No | — | Workspace-level fallback. Per-user keys (in /settings) take precedence. |
OPENROUTER_MODEL | No | — | Default text model for users with no preference set. |
OPENROUTER_IMAGE_MODEL | No | — | Default image-capable chat model. |
OPENAI_API_KEY | No | — | Optional. Enables strict image trim sizes via OpenAI's /v1/images/generations. |
OPENAI_IMAGE_MODEL | No | gpt-image-1 | — |
SMTP_HOST / SMTP_PORT / SMTP_USER / SMTP_PASS / SMTP_FROM / SMTP_SECURE | No | — | Required to deliver public Contact form messages. Without these, the contact endpoint returns 503. |
🎛️ Frontend environment variables
| Variable | Required | Default | Purpose |
|---|---|---|---|
NEXT_PUBLIC_API_URL | No | http://localhost:5001/api | Base URL for all API calls. Must include /api. |
🎨 Branding & rebrand checklist
BookraftAI is designed to be rebranded in minutes. All user-facing branding is centralised in one constants file:
frontend/lib/branding.tsEdit these constants:
APP_NAME— used in metadata, footer, legal pages, and admin labels.APP_TAGLINE— homepage / footer tagline.SUPPORT_EMAIL,LEGAL_EMAIL,PRIVACY_EMAIL— defaults shown on legal pages and as the deactivated-page fallback. The admin can also override the support email at runtime via Admin → Settings.
Then swap these visual assets:
frontend/public/logo_light.pngandlogo_dark.png— header / footer logo.frontend/public/images/— landing page artwork.frontend/app/favicon.ico— browser tab icon.
Optionally, update the package names:
frontend/package.json→"name"backend/package.json→"name"
✉️ Email / SMTP setup
The public Contact form (POST /api/contact) and the deactivated-account "Contact Support" link both use the admin-configured Support Email. To deliver Contact messages, configure SMTP in backend/.env:
SMTP_HOST=smtp.example.com
SMTP_PORT=587
SMTP_SECURE=false
SMTP_USER=mailer@example.com
SMTP_PASS=your-smtp-password
SMTP_FROM="Your Brand <mailer@example.com>"smtp.gmail.com, port 587, SMTP_SECURE=false.
🤖 AI models
BookraftAI does not bundle inference. End users plug in their own keys via /settings:
| Provider | Used for | Default model |
|---|---|---|
| OpenRouter | Text + image (/chat/completions with modalities: ["image"]) | Text: anthropic/claude-sonnet-4.6 · Image: google/gemini-3.1-flash-image-preview |
| OpenAI (optional) | Image generation only — direct /v1/images/generations for precise sizing | gpt-image-1 |
If a user has no OpenAI key, image generation falls back to OpenRouter (which silently ignores the requested size — OpenRouter returns square images regardless of trim). Users can also force all image traffic through OpenRouter via the forceOpenRouterForImages flag in their settings.

💳 Payment gateways
Four gateways are integrated. Admins enable any combination via Admin → Payment Gateways. Keys are stored in MongoDB, not in env vars, so they're shared across backend instances.
| Gateway | Required keys | Where to find them |
|---|---|---|
| Stripe | Publishable key, Secret key | Stripe dashboard → Developers → API keys |
| PayPal | Client ID, Secret | PayPal Developer dashboard → My Apps & Credentials |
| Razorpay | Key ID, Key Secret | Razorpay dashboard → Settings → API Keys |
| Dodo Payments | API Key, Webhook Secret | Dodo dashboard → Developers |
Webhook URLs follow the pattern https://<your-api-host>/api/payments/<gateway>/webhook. Configure them in each gateway's dashboard so plan purchases get marked as completed and credits are granted.
🔐 Google OAuth
- Open Google Cloud Console → APIs & Services → Credentials.
- Create an OAuth 2.0 Client ID of type Web application.
- Authorised redirect URI:
{SERVER_URL}/api/auth/google/callback(e.g.https://api.yourdomain.com/api/auth/google/callback). - Copy the Client ID and Client Secret into
backend/.envasGOOGLE_CLIENT_ID/GOOGLE_CLIENT_SECRET. - Restart the backend. The "Sign in with Google" button on
/loginactivates automatically.
If both env vars are unset, the route returns 503 cleanly and the button is hidden.
🛠 Admin panel
Pages under /admin/* are gated to users with role: "admin":
| Page | What it does |
|---|---|
| Users | List, edit credits directly, toggle active/deactivated status. |
| Plans | CRUD credit bundles (name, price, generations granted, gateway IDs, popular flag). |
| Gateways | Per-gateway enable/disable, test/live toggle, key entry. |
| Purchases | Full purchase history with status filters. |
| Analytics | Platform totals + last 7 days breakdown of revenue and signups. |
| Settings | Workspace currency, support email, contact info, social links, default user limits (signup credits). |
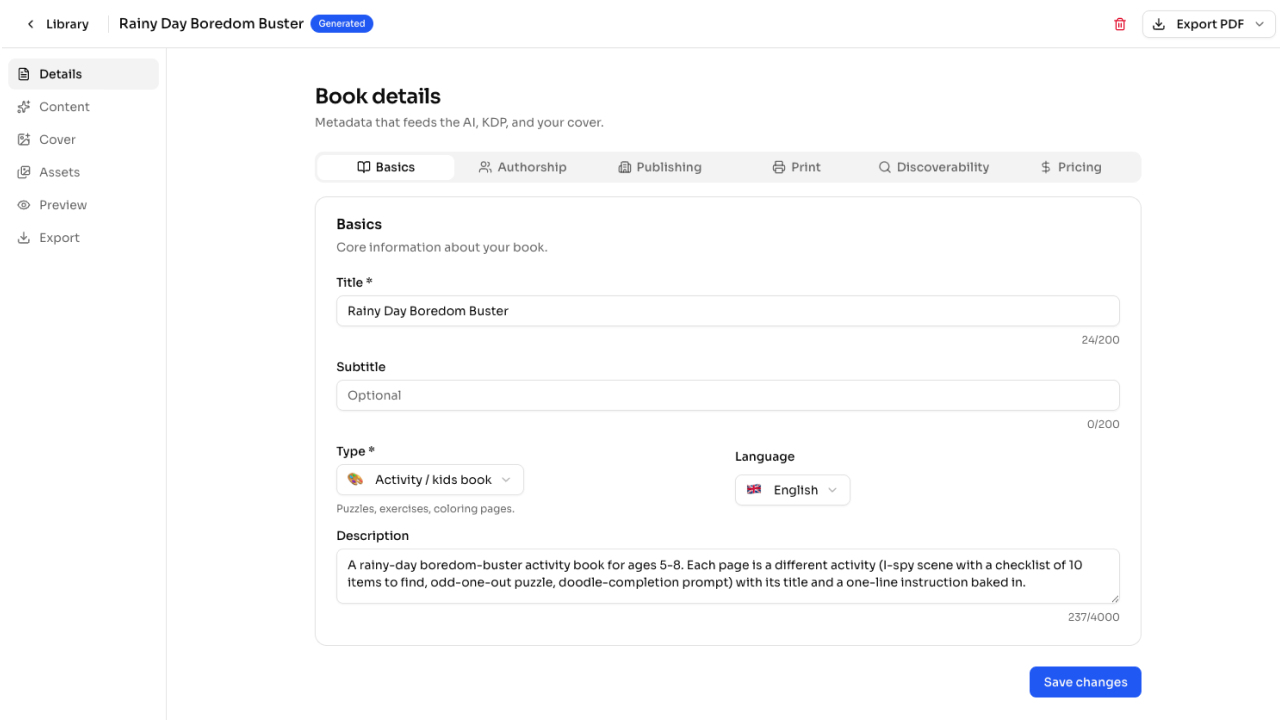
📝 Book workshop
The workshop at /book/[id] is a tabbed editor:
| Tab | What it does |
|---|---|
| Details | Title, subtitle, author, series, ISBN, publication date, language, age/grade range, KDP keywords, Amazon category. |
| Content | Stream new pages, regenerate any page with a custom prompt, rewrite individual blocks (text / heading / image-prompt), insert / duplicate / delete pages. |
| Cover | Generate or remix the cover with style-guide control. |
| Assets | Persistent asset library — every generated image is saved and can be reused across pages. |
| Preview | Full-book preview with KDP-style page composition (backgrounds, page numbers). |
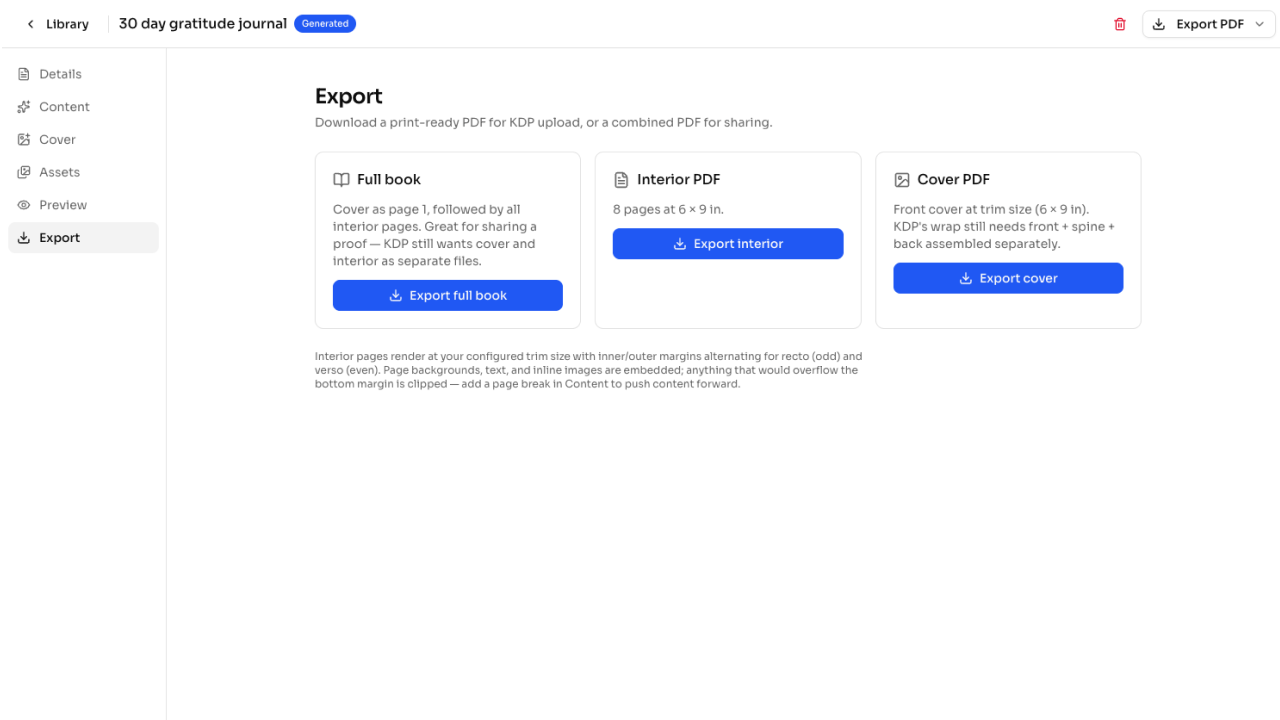
| Export | Download full book / interior-only / cover-only PDF. |
📄 KDP-ready PDF export
PDF export runs entirely in the browser via jsPDF — manuscripts never leave the user's device during export. Three export modes:
- Full book — cover + interior in one file.
- Interior only — for KDP's separate manuscript upload.
- Cover only — for KDP's cover upload form.
Trim sizes (6×9", 8.5×11", custom), margins, bleed (0.125"), paper type, interior color, page numbering position/font/color/start-offset, and per-page background images are all configurable in the workshop's Details tab.
⚡ VPS install (recommended)
BookraftAI ships with two interactive Bash scripts under setup/ that take a fresh Ubuntu VPS to a live, SSL-secured deployment in under 15 minutes:
| Script | What it does |
|---|---|
setup/setup.sh | Installs Node.js 20, MongoDB 7, and PM2. Prompts for your domains and API keys, then writes backend/.env and frontend/.env.local, installs deps, and runs npm run build on the frontend. |
setup/deploy.sh | Installs Nginx + Certbot, configures reverse-proxy vhosts for the API and frontend subdomains, starts both apps under PM2, and issues Let's Encrypt SSL certificates. |
root or with sudo.
Prerequisites
- A fresh Ubuntu VPS with SSH access (1 GB RAM minimum, 2 GB recommended).
- Two subdomains you control — one for the frontend (e.g.
app.example.com) and one for the API (e.g.api.example.com). - Your OpenRouter API key (used as the workspace-level fallback for AI generation; end users can override in
/settings). - Optional: OpenAI key, Google OAuth credentials, SMTP credentials. The script prompts for these but accepts blanks.
Step 1 — Clone the project on your VPS
cd /opt
git clone https://github.com/your-username/bookraft-ai.git
cd bookraft-ai
If you uploaded the CodeCanyon zip instead of cloning, scp or rsync it to /opt/bookraft-ai/ and unzip in place.
Step 2 — Run the installer
sudo bash setup/setup.shYou'll see an interactive menu. Choose 1) Complete Installation. The script will:
- Install Node.js 20, MongoDB 7 (official repo), and PM2 — skipping anything already installed, so it's safe to re-run.
- Prompt for your frontend domain (e.g.
app.example.com) and backend domain (e.g.api.example.com). Enter them withouthttp://. - Prompt for the MongoDB URI — accept the default
mongodb://localhost:27017/bookraft-aito use the local Mongo it just installed. - Prompt for Google OAuth (skip with blank values to hide the Google button), OpenRouter, OpenAI (optional), and SMTP (optional — only required if you want the public Contact form to deliver).
- Generate a strong
JWT_SECRETviaopenssl rand -base64 48. - Install backend and frontend dependencies and build the frontend.
PORT=5051 for the backend and starts the frontend on port 3051. These were chosen to avoid clashing with other Node apps you may already run on the box. If you're running BookraftAI alongside other PM2 apps, verify the ports are free first: sudo ss -ltn 'sport = :5051' 'sport = :3051'. If something else is bound, edit PORT in setup/setup.sh and the proxy_pass lines in setup/deploy.sh before running them.
Step 3 — Point your DNS
At your DNS provider, add two A records pointing to your VPS's public IPv4:
app.example.com    A    <vps-ipv4>
api.example.com    A    <vps-ipv4>
Wait until both resolve before continuing. Verify from the VPS itself:
dig +short app.example.com @1.1.1.1
dig +short api.example.com @1.1.1.1
# both should print your VPS IPdig doesn't return your VPS IP, wait 5–10 minutes before running deploy.sh.
Step 4 — Run the deployment wizard
sudo bash setup/deploy.shThe script will:
- Confirm DNS is pointing at the server.
- Install Nginx and Certbot.
- Write Nginx vhosts at
/etc/nginx/sites-available/bookraft-apiand/etc/nginx/sites-available/bookraft-ui, then enable them. The API vhost includesproxy_buffering offand 3600-second timeouts so live SSE page-streaming works without chunking. - Install backend dependencies and start the API under PM2 as
bookraft-api. - Start the Next.js frontend under PM2 as
bookraft-uion port 3051. - Save the PM2 process list and configure it to auto-start on reboot.
- Optionally run
certbot --nginxfor both subdomains, then patchSERVER_URL,CLIENT_URL, andNEXT_PUBLIC_API_URLin the env files tohttps://and rebuild the frontend.
At the end you'll see:
🚀 DEPLOYMENT SUCCESSFUL!
  Frontend URL: https://app.example.com
  Backend API:  https://api.example.com
Step 5 — Bootstrap the first admin
Visit https://app.example.com/signup and sign up. The first account is auto-promoted to admin. Then:
- Settings → paste your OpenRouter key (and OpenAI key if you want strict image trim sizes).
- Admin → Plans → create at least one credit bundle.
- Admin → Payment Gateways → enable Stripe, PayPal, Razorpay, and/or Dodo Payments. Configure webhooks on each gateway dashboard to
https://api.example.com/api/payments/<gateway>/webhook. - Admin → Settings → set Support Email and any contact/social links.
If you later need to enable Google sign-in, set the redirect URI in Google Cloud Console to:
https://api.example.com/api/auth/google/callback…then add the Client ID and Secret to backend/.env (or re-run setup.sh → option 2) Update Application Configuration), and restart with pm2 restart bookraft-api.
Useful PM2 commands
pm2 list                          # show all processes
pm2 logs bookraft-api             # tail backend logs
pm2 logs bookraft-ui              # tail frontend logs
pm2 restart bookraft-api          # restart backend after .env change
pm2 restart bookraft-ui           # restart frontend (after `npm run build`)
pm2 monit                         # interactive monitor
Updating to a newer version
cd /opt/bookraft-ai
# Replace source: git pull, or upload the new CodeCanyon zip and unzip in place

cd backend  && npm install && cd ..
cd frontend && npm install && npm run build && cd ..

pm2 restart bookraft-api bookraft-ui
If env variables changed in the new release, run sudo bash setup/setup.sh → 2) Update Application Configuration to merge them without overwriting your existing values.
Rolling back
Both scripts write timestamped .bak.YYYYMMDD_HHMMSS backups of any env file they touch. To roll back to a previous configuration:
ls backend/.env.bak.*
cp backend/.env.bak.20260101_120000 backend/.env
pm2 restart bookraft-api
🌐 Deployment
If you can't use the VPS scripts above (e.g. you're deploying to Vercel/Railway, Render, a managed Kubernetes cluster, or a different distro), the platform deploys cleanly as two standard Node apps. The settings below apply to any host.
Frontend
Standard Next.js 16 deployment. Recommended: Vercel.
- Set
NEXT_PUBLIC_API_URLto your backend's public origin +/api. - Run
npm run buildin CI to catch type errors before promoting.
Backend
Any Node 18+ host (Render, Railway, Fly.io, a $6 VPS, etc.). Required environment:
NODE_ENV=production— enables fail-fast on missing/placeholderJWT_SECRET.MONGODB_URI,JWT_SECRET,CLIENT_URL,SERVER_URL.
Persistent uploads
backend/uploads/
Generated images are stored on disk under backend/uploads/. On ephemeral hosts (containers, serverless), mount a persistent volume to that path, or proxy uploads to S3/R2. Without persistent storage, generated images vanish on restart.
🛡 Security checklist before going live
- Set
NODE_ENV=production. The backend will refuse to boot with the placeholderJWT_SECRET. - Generate a strong
JWT_SECRET(e.g.node -e "console.log(require('crypto').randomBytes(48).toString('base64'))"). - Lock down the first-admin path: sign up before the URL is publicly known, or pre-seed an admin user.
- Set MongoDB to require authentication and bind to a private network.
- Configure HTTPS (the included Helmet middleware sets sane security headers; HSTS is on by default).
- Configure rate limiting at the proxy/CDN as well — the bundled
express-rate-limitcovers/api/users/login,/api/users/signup, and/api/contactat the app layer. - Rotate any AI provider keys you used during development.
- Review CORS — by default only
CLIENT_URLcan call the API.
🩺 Troubleshooting
"Server is healthy" but requests fail with CORS
Set CLIENT_URL in backend/.env to the exact origin of your frontend (no trailing slash). Restart the backend.
Google sign-in returns 503
Both GOOGLE_CLIENT_ID and GOOGLE_CLIENT_SECRET must be set. Restart after editing .env.
Image generation returns square images at the wrong size
OpenRouter's chat-completions image modality silently ignores the size parameter. To get the trim size you asked for, add an OPENAI_API_KEY in user Settings — the server will route image calls through OpenAI's strict /v1/images/generations.
Contact form returns 503 "not configured"
Either the admin Support Email or the SMTP env vars are missing. Set both: Admin → Settings → Support Email, and SMTP_HOST/SMTP_PORT/SMTP_USER/SMTP_PASS in backend/.env.
Generated images disappear after server restart
You're on an ephemeral filesystem. Mount a persistent volume to backend/uploads/ or change the storage backend.
Backend refuses to boot in production with "JWT_SECRET is missing or set to the placeholder"
This is the intended safeguard. Set a strong unique JWT_SECRET in your production environment.
📜 Third-party licenses
BookraftAI bundles or depends on the following open-source projects. All are CodeCanyon-compatible (MIT, ISC, Apache 2.0, OFL):
- Sora font — SIL Open Font License (OFL)
- Lucide Icons, React Icons — ISC / MIT
- shadcn/ui, Radix UI, Tailwind CSS, Framer Motion — MIT
- Next.js, React — MIT
- Express, Mongoose, Passport, Helmet, express-rate-limit, Joi, Nodemailer — MIT
- jsPDF — MIT
- OpenAI Node SDK — Apache 2.0
- Stripe, Razorpay, Dodo Payments SDKs — MIT / Apache 2.0
🗒 Changelog
See CHANGELOG.md in the project root for the full version history.
v1.0.0 — Initial release
- Two AI book engines (text + image-page), 23 book types, workshop editor, KDP-ready PDF export.
- Bring-your-own-key AI integration (OpenRouter + optional OpenAI).
- Email + Google OAuth auth, JWT sessions.
- Pay-per-credit billing with Stripe, PayPal, Razorpay, Dodo Payments.
- Admin panel: users, plans, gateways, purchases, settings, analytics.
- Centralised branding constants for fast rebranding.
- Contact form with Nodemailer SMTP delivery.
- Helmet + rate limiting on auth and contact endpoints.
- Production safeguard: backend refuses to boot with the placeholder JWT secret.
💬 Support
For installation help, bugs, and feature questions, contact us via your CodeCanyon item's Comments tab or the Support tab on the item page.
node -v), the relevant log lines from the backend or browser console, and which page or API call surfaced the issue. That cuts the back-and-forth in half.